Mail Merge Using SharePoint List as Data Source


I have found several articles on the web that made mail merge using a SharePoint 2010 list as the data source possible which has spawned this post. The instructions I found online were great, up to a certain point, however. Most of the instructions assumed the users had some basic understanding and thus many steps were omitted which reduces the target audience that can use their instructions considerably. These instructions are intended for folks who have not worked with the Visual Basic Macro editor and don’t have a lot of interest in learning how to do it. They just want to get their work done.

Setup Info

I have created the following test documents and test SharePoint lists for these instructions. You will need to do the same for your project.

Files/Data Used

  • Create Data Source list in SharePoint 2010
  • Open Notepad and save an empty file as TestMergeSource.odc to the following location
    • C:\Program Files (x86)\Microsoft Office\Office14\QUERIES
  • Open Microsoft Word (2007 or 2010)
  • Save Word document as TestMergeDocument.docx to SharePoint 2010 document library location noted above
  • In Word document click View tab
  • Click View Macros (see below)
  • Enter a name in the Macro name: field (no spaces)
    • I named mine Test_Merge_Source
  • Select All active templates and documents in the Macros in: drop down (see below)
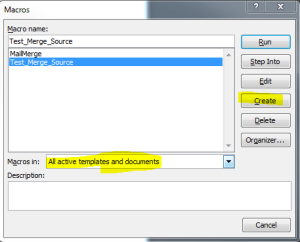
  • Click Create button
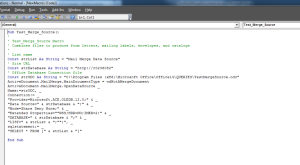
  • Paste the below code into the Visual Basic Editor replacing bolded sections with your filenames
    • (NOTE: If you have more than one macro, your editor may have multiple Sub sections, this is ok)
Sub Test_Merge_Source()
Test_Merge_Source Macro
‘ Combines files to produce form letters, mailing labels, envelopes, and catalogs
‘ List name
Const strList As String = “Mail Merge Data Source
‘ Site URL
Const strDatabase As String = “http://your.domain.com
‘ Office Database Connection file
Const strODC As String = “C:\Program Files (x86)\Microsoft Office\Office14\QUERIES\TestMergeSource.odc
ActiveDocument.MailMerge.MainDocumentType = wdNotAMergeDocument
ActiveDocument.MailMerge.OpenDataSource _
Name:=strODC, _
Connection:= _
“Provider=Microsoft.ACE.OLEDB.12.0;” & _
“Data Source=” & strDatabase & “;” & _
“Mode=Share Deny None;” & _
“Extended Properties=””WSS;HDR=NO;IMEX=2;” & _
“DATABASE=” & strDatabase & “;” & _
“LIST=” & strList & “;””;”, _
sqlstatement:= _
“SELECT * FROM [” & strList & “]”
 
End Sub
 
  • Your completed code will look like the image below with no other Macros present, if you do have others your code will look different
  • Click Save when done
  • Close the Visual Basic Editor screen
  • Back in Word click the Macros button and click View Macros again
  • You should now see the newly created Macro named Test_Merge_Source (or whatever you named yours… see below)
  • Select your Macro and click Run
  • Click the Mailings tab
  • Click the Edit Recipients List button in the Start Mail Merge section
  • Validate the recipients list is accurate (see below)
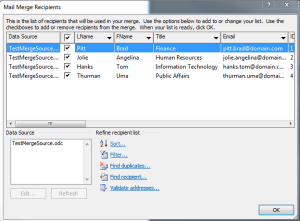
  • If all is correct, create your document as you normally would and then save the document.
  • You will not need to repeat these steps unless you move to a different computer or remove the code added above

You can also use this macro for other Word Documents that you want to use the same data source. This is why I recommend saving the macro with a name specific to the data source (SharePoint List).

 If these instructions were helpful please leave a comment or if you had issues understanding/following them please leave feedback so I can fix them.

Microsoft Office Resources


Microsoft Office has been the productivity suite of choice for a large majority of businesses and organizations for years. The biggest challenge is training and keeping staff and other users trained on the products.

In this day and age, users are expected to be Self-Learners, thereby reducing the overhead in terms of training costs. This, however, isn’t always a natural personality trait for all users. This article isn’t intended to tackle the ins and outs of why or how to address this. It simply is intended to show users a quick easy resource to access to help become a Self-Learner for Microsoft Office products.

Microsoft has created many different versions of their Help/Support sites over the years to help users learn about their products. This latest version seems to be the most user friendly and intuitive of them all.

I strongly invite all users of Office products to check out the link below to learn more about their Office Products so you can better utilize these resources our employers have provided us and become or continue to be a Self-Learner.

http://office.microsoft.com/en-us/word-help/#

Buy Microsoft Office


Click the link below if you are interested in purchasing a discounted copy of Microsoft Office 2010 for home use.

http://www.journeyed.com/

You can get Microsoft Office 2010 Professional for $89.98. That’s a savings of up to $410.01 off regular retail prices.

You can also purchase other software from this vendor for home use, such as Windows 7 and Adobe Photoshop.

Using the Mail Summary E-Mail


With the installation of the new Lightspeed Total Traffic Control product you should have noticed a new e-mail in your inbox sent everyday at 5:00 am. The message indicates it is from “Mail Summary” and the Subject line should say “Mail Summary for username@isd2899.k12.mn.us”

What is this e-mail and how can you use it?

The Mail Summary message you get every day gives you a summary of all the e-mails you got the previous day. The e-mails are put into three categories:

  • SPAM
  • Virus
  • Good

This allows you to browse your messages to find messages that may have been filtered incorrectly as SPAM or allowed into your inbox when it should have been marked as SPAM.

Take a look at the video above for more details on how to utilize this e-mail. 

*Note that some of the features are only available while connected inside the P-E-M school district*

Sending a Delayed E-mail


We may not all have had this happen, but for those who have it would have been nice if the sender knew how to send a delayed e-mail.

If you have your e-mail synced with your cell phone you’ve probably gotten e-mails at strange hours at night. That 2:00am e-mail from a co-worker that woke you up so you could find out that the meeting on Monday is now cancelled would have been fine if you got it at 6:00am, not 2:00am when they wrote and sent the message.

As a common courtesy to your recipients it is a good idea to know how to delay e-mail messages from being sent. This is especially true if you find you typically need to write your e-mails late at night as I do.

My phone doesn’t beep or buzz when I get an e-mail but many peoples do and that can be quite startling to get that e-mail at 2:00am in the morning.

The following instructions are also in the Microsoft Office Outlook help menu and can be downloaded by clicking the link below as well. It is a quick and easy couple of steps that your recipients will appreciate you have taken to help them get a better nights rest.

Delay the delivery of a single message

  1. In the message, on the Options tab, in the More Options group, click Delay Delivery Button image.
  2. Under Delivery options, select the Do not deliver before check box, and then click the delivery date and time that you want.

After you click Send, the message remains in the Outbox folder until the delivery time.

 Note   If you are using a POP3 account, Outlook must remain open until the message is sent. To determine the type of account you are using, on the Tools menu, click Account Settings. On the E-mail tab, the Type column lists the type of accounts that are in your active Outlook profile.

Click Here to Download Instructions